How to do clipping mask in photopea?
September 13, 2022Hello Friends 👋,
Welcome To aGuidehub! ❤️
To do clipping mask in photopea, go to the layer panel, select the layer and then open the popup and click on the clipping mask. It will make a clipping mask.
Today, I am going to show you how I do clipping mask in photopea.
Clipping masks are another very popular property in PSD files. When a layer is set to be a clipping mask, it is applied only to the layer beneath it (the bottom layer “clips” the clipping mask layer).
Table of contents
- Create a shape.
- Insert image.
- Go to layer panel.
Let’s start with the first step.
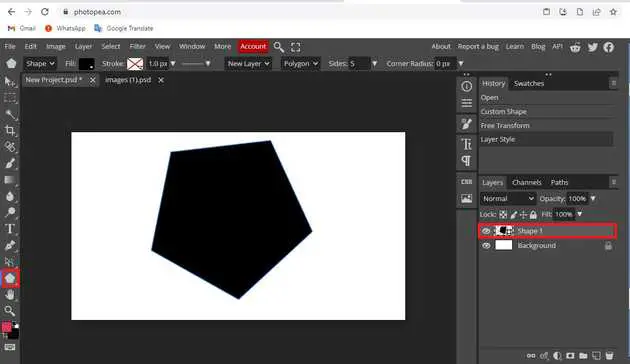
Step 1: Create a shape.
Select the shape-tool, This can be done by clicking on the icon depicted below located in the toolbar down the left side of the screen, or by hitting the g button on your keyboard.
Step 2: Insert image.
Open the photopea and Select photo, it will open a file browser or download folder you can select the image. And click open button.
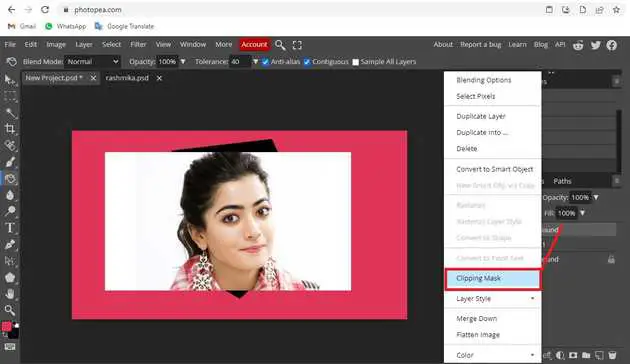
Step 3: Go to layer panel.
Going to the right side of the photopea, in the layer panel, first select the layer, When a layer is set to be a clipping mask, it is applied only to the layer beneath it (the bottom layer “clips” the clipping mask layer). When there is a “chain” of clipping masks, all of them are applied to the first layer beneath them, which is not a clipping mask.
To make a layer a clipping mask, you can right-click it and select Enable Clipping Mask / Disable Clipping Mask.
When you follow the above steps then it will clipping mask in photopea.
All the best 👍


