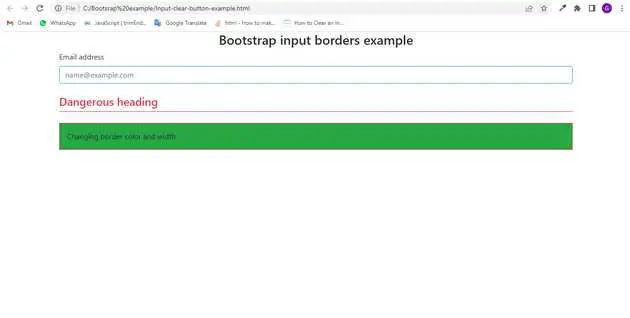
Bootstrap input border example
June 22, 2022Hi Friends 👋,
Welcome To aGuideHub! ❤️
To make input border, put the .border class to create an input border in bootstrap for example.
Today, I am going to show you. how to create input border in bootstrap with code example.
Table of contents
- Includes bootstrap view
- Includes bootstrap library
- Define its class name
This article will guide you to adding input borders in Bootstrap 4 with example.
Step 1: Includes bootstrap view
To ensure proper rendering and touch zooming for all devices, add the responsive viewport meta tag to your <head>.
<meta name="viewport" content="width=device-width, initial-scale=1">Step : Includes bootstrap library
First of all, load the Bootstrap 4 framework CSS into the head tag of your webpage.
<!-- Bootstrap CSS -->
  <link rel="stylesheet" href="https://maxcdn.bootstrapcdn.com/bootstrap/4.3.1/css/bootstrap.min.css">
  <link rel="stylesheet" href="https://use.fontawesome.com/releases/v5.6.3/css/all.css" integrity="sha384-UHRtZLI+pbxtHCWp1t77Bi1L4ZtiqrqD80Kn4Z8NTSRyMA2Fd33n5dQ8lWUE00s/" crossorigin="anonymous"></head>
  <script src="https://ajax.googleapis.com/ajax/libs/jquery/3.5.1/jquery.min.js"></script>
  <script src="https://cdnjs.cloudflare.com/ajax/libs/popper.js/1.16.0/umd/popper.min.js"></script>
  <script src="https://maxcdn.bootstrapcdn.com/bootstrap/4.3.1/js/bootstrap.min.js"></script>
Step 3: Define its class name
After that, create the input border with a class name .border border-danger.
<h3 class="text-center">Bootstrap input borders example</h3>
<div class="container">
    <div class="mb-4">
        <label for="exampleFormControlInput1" class="form-label">Email address</label>
        <input type="email" class="form-control border-info" id="exampleFormControlInput1" placeholder="[email protected]">
      </div>

      <div class="h4 pb-2 mb-4 text-danger border-bottom border-danger">
        Dangerous heading
      </div>

      <div class="p-3 bg-success bg-opacity-10 border border-danger border-start-0 rounded-end">
        Changing border color and width
      </div>
</div>
Example.
Let’s look at the following example to understand how it basically works:
<!DOCTYPE html>
<html lang="en">
<head>
  <title>Bootstrap Example</title>
  <meta charset="utf-8">
  <meta name="viewport" content="width=device-width, initial-scale=1">
  <link rel="stylesheet" href="https://maxcdn.bootstrapcdn.com/bootstrap/4.3.1/css/bootstrap.min.css">
  <link rel="stylesheet" href="https://use.fontawesome.com/releases/v5.6.3/css/all.css" integrity="sha384-UHRtZLI+pbxtHCWp1t77Bi1L4ZtiqrqD80Kn4Z8NTSRyMA2Fd33n5dQ8lWUE00s/" crossorigin="anonymous"></head>
  <script src="https://ajax.googleapis.com/ajax/libs/jquery/3.5.1/jquery.min.js"></script>
  <script src="https://cdnjs.cloudflare.com/ajax/libs/popper.js/1.16.0/umd/popper.min.js"></script>
  <script src="https://maxcdn.bootstrapcdn.com/bootstrap/4.3.1/js/bootstrap.min.js"></script>
</head>
<body>
<h3 class="text-center">Bootstrap input borders example</h3>
<div class="container">
    <div class="mb-4">
        <label for="exampleFormControlInput1" class="form-label">Email address</label>
        <input type="email" class="form-control border-info" id="exampleFormControlInput1" placeholder="[email protected]">
      </div>

      <div class="h4 pb-2 mb-4 text-danger border-bottom border-danger">
        Dangerous heading
      </div>

      <div class="p-3 bg-success bg-opacity-10 border border-danger border-start-0 rounded-end">
        Changing border color and width
      </div>
</div>
</body>
</html>
Check the output of the above code example.
All the best 👍
