How to override Bootstrap style?
May 26, 2022Hi Friends 👋,
Welcome To aGuideHub! ❤️
Today, I am going to show you. How to override Bootstrap style.
Table of contents
- Includes bootstrap view
- Includes bootstrap library
- Included JS bootstrap
- Includes css in html page
- Define its class name
This article will guide you to adding override in Bootstrap with example.
Overriding Bootstrap via CSS
The most straightforward way of overriding Bootstrap styles is using plain old CSS. In this case, you will need to include your own CSS file after having Bootstrap included. Here’s an example:
<!-- Bootstrap CSS -->
<link rel="stylesheet" href="bootstrap.min.css">

<!-- CSS where you override -->
<link rel=”stylesheet” href=”custom.css”>
In this case, the specificity is the same as for the default Bootstrap styles, but it is being overridden because it is written after the initial styles.
Some Bootstrap selectors may have a higher specificity so you will have to write selectors that match that specificity or have a higher one. Here’s an example:
/* bootstrap.min.css */
.navbar-light .navbar-brand {
    color: hsl(10, 77%, 47%) !important;
}
This is the default style for the branding element inside the navigation bar. If you want to override this you would need to write with the exact same specificity or a higher one:
/* custom.css */
.navbar-light .navbar-brand {
    color: #FC7F66 !important;
}
Step 1: Includes bootstrap view
To ensure proper rendering and touch zooming for all devices, add the responsive viewport meta tag to your <head>.
<meta name="viewport" content="width=device-width, initial-scale=1, shrink-to-fit=no">Step 2: Includes bootstrap library
First of all, load the Bootstrap framework CSS into the head tag of your webpage.
    <link rel="stylesheet" href="https://cdn.jsdelivr.net/npm/[email protected]/dist/css/bootstrap.min.css"
    integrity="sha384-Gn5384xqQ1aoWXA+058RXPxPg6fy4IWvTNh0E263XmFcJlSAwiGgFAW/dAiS6JXm" crossorigin="anonymous">
    <link rel="stylesheet" href="bootstrap.min.css">
    <link rel=”stylesheet” href=”custom.css”>
Step 3: Included JS bootstrap
Now, load the Bootstrap JavaScript file before closing the body tag and done.
    <!-- Optional JavaScript -->
   <!-- jQuery first, then Popper.js, then Bootstrap JS -->
   <script src="https://code.jquery.com/jquery-3.2.1.slim.min.js"
       integrity="sha384-KJ3o2DKtIkvYIK3UENzmM7KCkRr/rE9/Qpg6aAZGJwFDMVNA/GpGFF93hXpG5KkN"crossorigin="anonymous"></script>
   <script src="https://cdn.jsdelivr.net/npm/[email protected]/dist/umd/popper.min.js"
       integrity="sha384-ApNbgh9B+Y1QKtv3Rn7W3mgPxhU9K/ScQsAP7hUibX39j7fakFPskvXusvfa0b4Q"
       crossorigin="anonymous"></script>
   <script src="https://cdn.jsdelivr.net/npm/[email protected]/dist/js/bootstrap.min.js"
       integrity="sha384-JZR6Spejh4U02d8jOt6vLEHfe/JQGiRRSQQxSfFWpi1MquVdAyjUar5+76PVCmYl"
       crossorigin="anonymous"></script>
Step 4: Includes css in html page
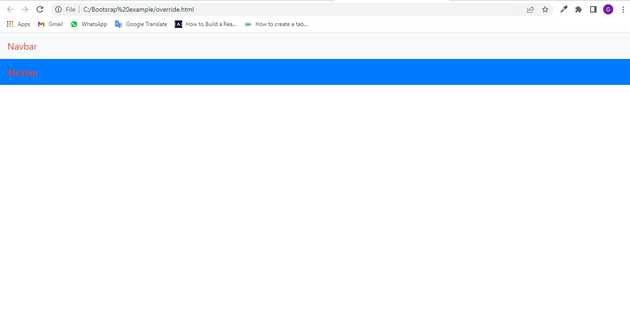
Here we are using css class to change the color of the bootstrap class.
    <style>
        .navbar-light .navbar-brand {
            color: hsl(10, 77%, 47%) !important;
        }

        .navbar-light .navbar-brand {
            color: #d43b1c !important;
        }
    </style>
Step 5: Include the code in body
Include the code below in <body> to accept time from the user.
    <!-- As a link -->
    <nav class="navbar navbar-light bg-light">
        <a class="navbar-brand" href="#">Navbar</a>
    </nav>

    <!-- As a heading -->
    <nav class="navbar navbar-light bg-primary">
        <span class="navbar-brand mb-0 h1">Navbar</span>
    </nav>
Example.
Let’s look at the following example to understand how it basically works:
<!doctype html>
<html lang="en">

<head>
    <!-- Required meta tags -->
    <meta charset="utf-8">
    <meta name="viewport" content="width=device-width, initial-scale=1, shrink-to-fit=no">

    <!-- Bootstrap CSS -->
    <link rel="stylesheet" href="https://cdn.jsdelivr.net/npm/[email protected]/dist/css/bootstrap.min.css"
        integrity="sha384-Gn5384xqQ1aoWXA+058RXPxPg6fy4IWvTNh0E263XmFcJlSAwiGgFAW/dAiS6JXm" crossorigin="anonymous">
    <link rel="stylesheet" href="bootstrap.min.css">
    <link rel=”stylesheet” href=”custom.css”>

    <title>Hello, world!</title>
    <style>
        .navbar-light .navbar-brand {
            color: hsl(10, 77%, 47%) !important;
        }

        .navbar-light .navbar-brand {
            color: #d43b1c !important;
        }
    </style>
</head>

<body>
    <!-- As a link -->
    <nav class="navbar navbar-light bg-light">
        <a class="navbar-brand" href="#">Navbar</a>
    </nav>

    <!-- As a heading -->
    <nav class="navbar navbar-light bg-primary">
        <span class="navbar-brand mb-0 h1">Navbar</span>
    </nav>


    <!-- Optional JavaScript -->
    <!-- jQuery first, then Popper.js, then Bootstrap JS -->
    <script src="https://code.jquery.com/jquery-3.2.1.slim.min.js"
        integrity="sha384-KJ3o2DKtIkvYIK3UENzmM7KCkRr/rE9/Qpg6aAZGJwFDMVNA/GpGFF93hXpG5KkN"
        crossorigin="anonymous"></script>
    <script src="https://cdn.jsdelivr.net/npm/[email protected]/dist/umd/popper.min.js"
        integrity="sha384-ApNbgh9B+Y1QKtv3Rn7W3mgPxhU9K/ScQsAP7hUibX39j7fakFPskvXusvfa0b4Q"
        crossorigin="anonymous"></script>
    <script src="https://cdn.jsdelivr.net/npm/[email protected]/dist/js/bootstrap.min.js"
        integrity="sha384-JZR6Spejh4U02d8jOt6vLEHfe/JQGiRRSQQxSfFWpi1MquVdAyjUar5+76PVCmYl"
        crossorigin="anonymous"></script>
</body>

</html>
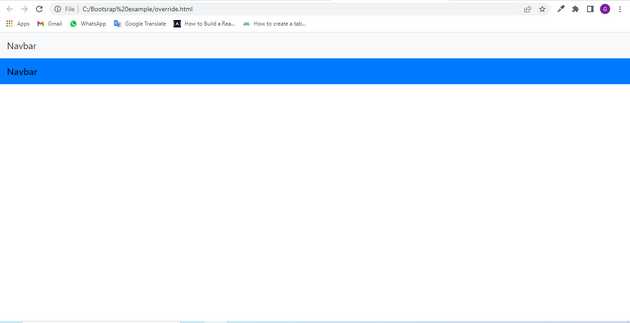
Check the output of the above code example.
All the best 👍

