How to cut in photopea?
July 17, 2022Hello Friends 👋,
Welcome To aGuidehub! ❤️
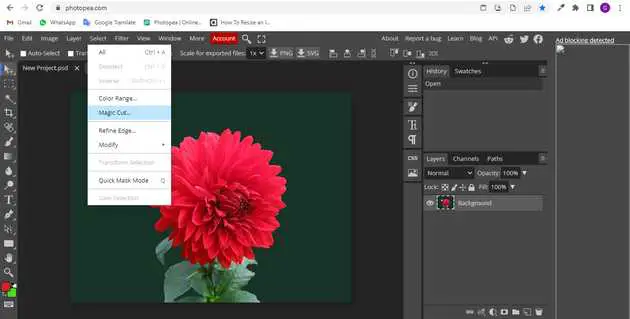
To cut in photopea, click on the magic tool and select the area in which you want to cut then click on the sign button. It will cut the selected area.
Today, I am going to show you how I cut a photo in photopea.
Magic Cut is a tool for removing background (cutting out an object) from a photo. It is one of the fastest ways to do it, and you can use it online for free.
Table of contents
- Insert image
- Select magic tool
Let’s start with the first step.
Step 1: Insert image.
You will open a File browser or download folder, you have selected the image and click on Open button.
Step 2: Select magic tool.
Magic Cut is a part of Photopea photo editor. Go to Photopea, press File - Open, and open an image you want to work with. Then, press Select - Magic Cut.
Use Magic Cut by painting over the image with two colors:
- Foreground (the object) with Green
- Background with Red
The workspace consists of two sides. You can paint on the left, and you will see the result on the right. At the top, you can choose the brush size and the color (Red or Green), a Grey is an eraser.
You can Zoom to a specific place with a Mouse Wheel, or by pressing Ctrl + Plus (or Minus) on your keyboard. You can move the image while holding the Spacebar, or by dragging the preview image
When you click on magic cut tool then pop up the dailobox.
When you start Magic Cut, your image is pre-marked with Red and Green, as the “initial guess”. You can keep working with that guess, or clear it with a Clear button and start from scratch. But make sure there is never any Green color in the background, or a Red color in the object (use the Grey color to erase such places).
Save The Image
When the result on the right looks well, press OK at the top to confirm it. Now, you can export your image as a PNG: File - Export As - PNG, confirm with Save. And it is done! :)
Instead of saving as a PNG, you could add a new background, and save it as JPG. Note, that PNG format supports transparent areas, while JPG does not.
When you follow the above steps then it will cut and it will show on the image in photopea .
All the best 👍


